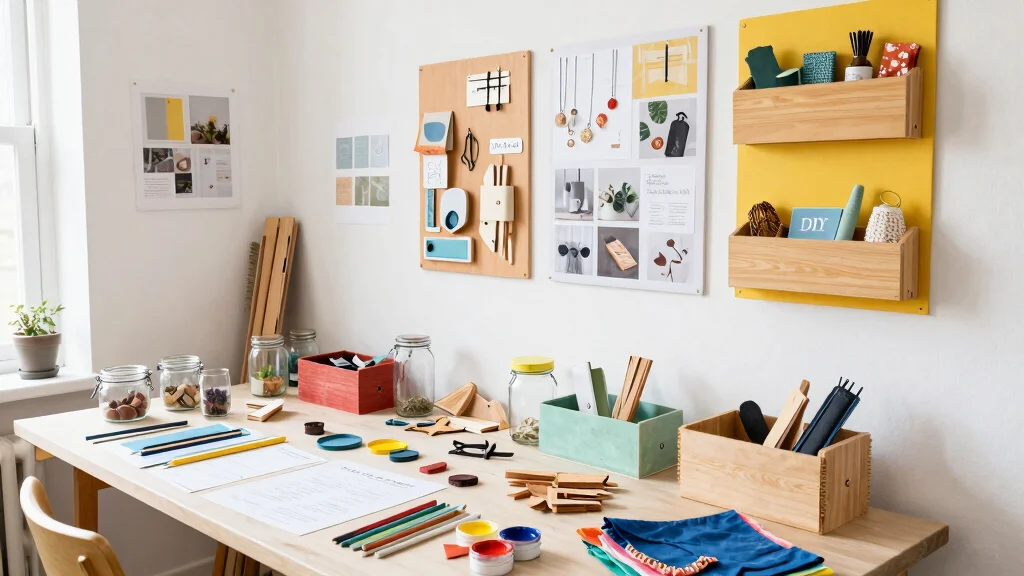
Are you tired of your accessories taking over your space? This time of year always reminds me of the clutter that builds up from my favorite jewelry and trinkets. If you’re someone who loves to mix and match accessories but finds them scattered everywhere, this post is for you. I’ve pulled together 15 budget-friendly DIY accessories holder ideas that are not only easy to create but also add a personal touch to your home decor.
Whether you’re a seasoned DIYer or just getting started, these creative storage solutions will help you organize your accessories without breaking the bank. You’ll discover how to turn everyday items into stylish organizers that enhance your space. From upcycled decor ideas to handmade organizers, these projects are perfect for anyone looking to declutter while embracing eco-friendly practices. Let’s dive into these fun and practical DIY accessories holder ideas that will keep your favorite items beautifully displayed and easily accessible.
Key Takeaways
– Each DIY project is budget-friendly, focusing on upcycled materials to help reduce waste and promote sustainability.
– The ideas cater to various styles, allowing you to find the perfect match for your home decor aesthetic.
– You’ll discover numerous creative storage solutions that are both functional and visually appealing, perfect for displaying your accessories.
– These projects are easy to follow, making them suitable for beginners and experienced crafters alike.
– Enjoy the satisfaction of creating personalized organizers that reflect your style while keeping your accessories tidy and organized.
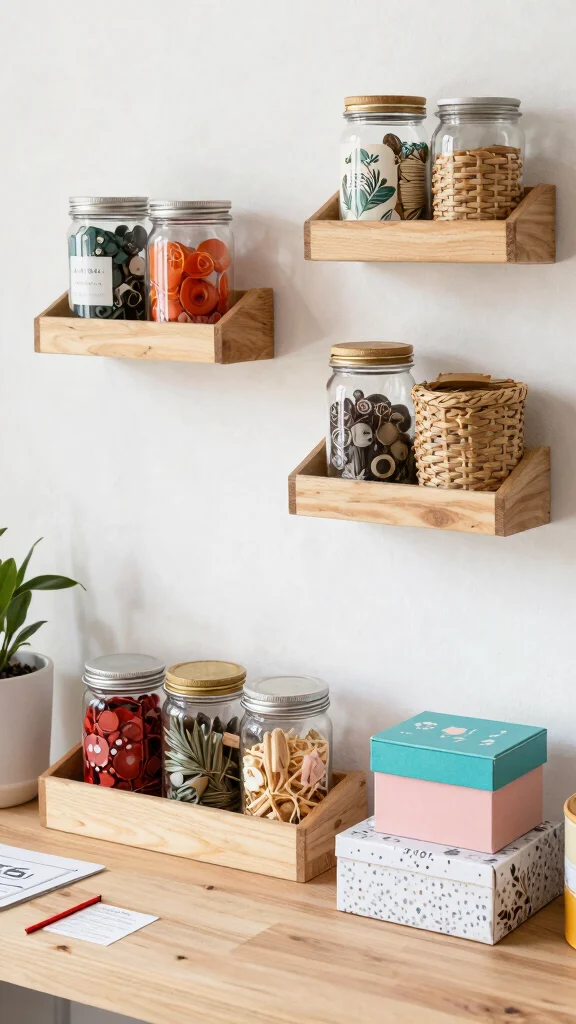
1. Mason Jar Wall Organizer
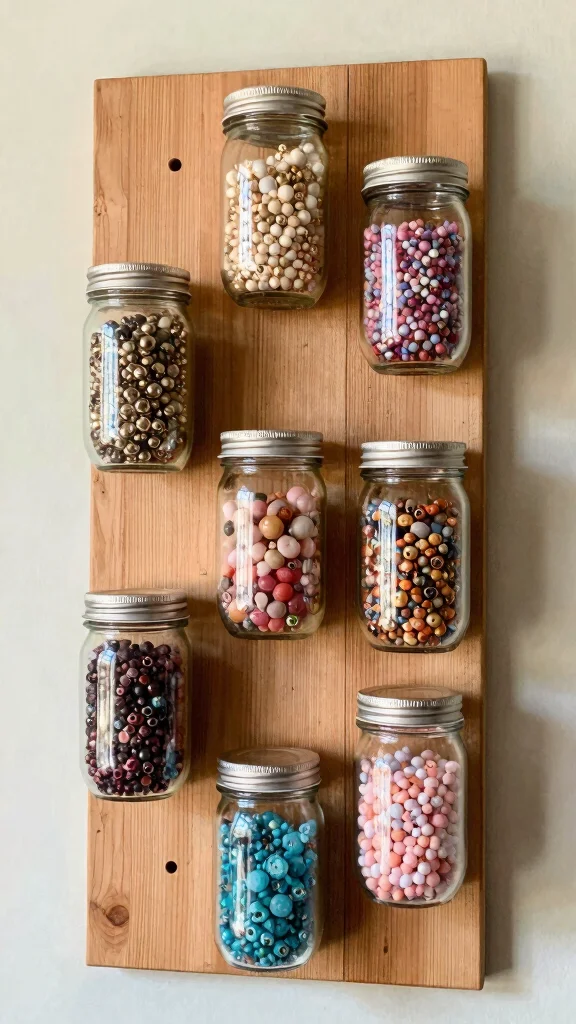
Transforming mason jars into a stylish wall organizer is a perfect way to blend functionality with creativity. This project shines with visual harmony as the clear glass and rustic wood create an inviting focal point in your home. Imagine vibrant colors from painted jars filled with earrings, bracelets, or even small craft supplies, perfectly displayed for easy access.
To create your own, consider using reclaimed wood for that rustic touch, and feel free to paint the jars in cheerful colors that match your decor. This project not only keeps your accessories organized but also adds a personal flair, reflecting your unique style.
Consider these elements to maximize this palette’s potential:
– Pair mason jars with a reclaimed wood base for an organic feel.
– Install hooks under the jars for added storage.
– Use twine or ribbon to hang jars for a softer look.
This charming organizer enhances your space and maintains an airy feel, making your accessories both visible and accessible.
2. Upcycled T-Shirt Necklace Holder
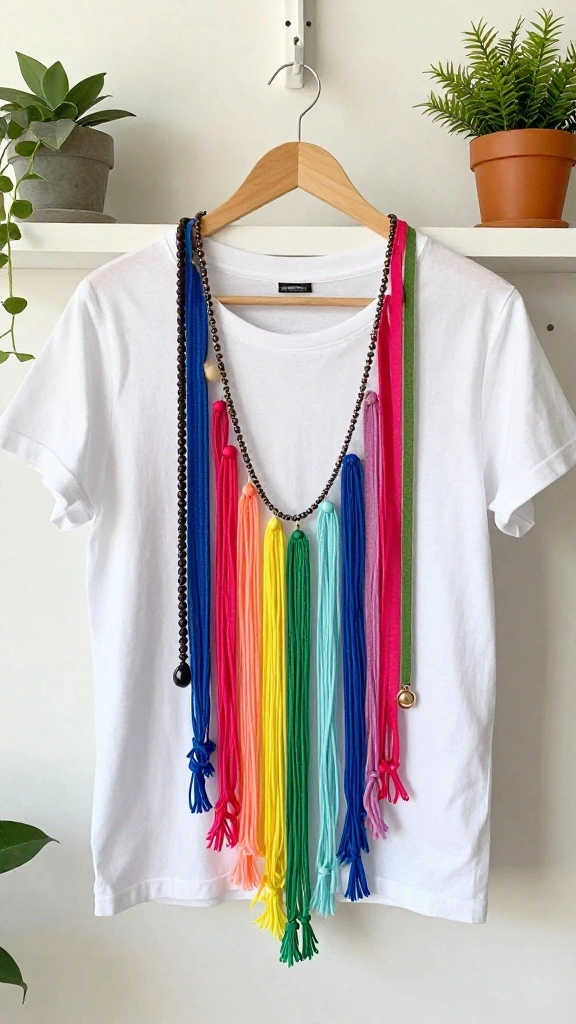
Transforming old t-shirts into a necklace holder not only saves money but also adds a touch of personality to your decor. This project allows you to express your creativity while keeping your favorite necklaces beautifully displayed. Imagine a colorful, woven masterpiece hanging on your wall, telling a story of sustainability.
To make this DIY project even easier, look for old t-shirts in fun patterns or colors that inspire you. This is a fantastic way to repurpose materials and create a unique piece that fits your style.
Follow these steps to create your necklace holder:
– Cut the t-shirt into strips for weaving.
– Braid the strips to form a sturdy holder.
– Attach a hook for easy wall mounting.
This eco-friendly project not only organizes your jewelry but also brings a fun, customized element to your room.
3. Wooden Pallet Jewelry Organizer
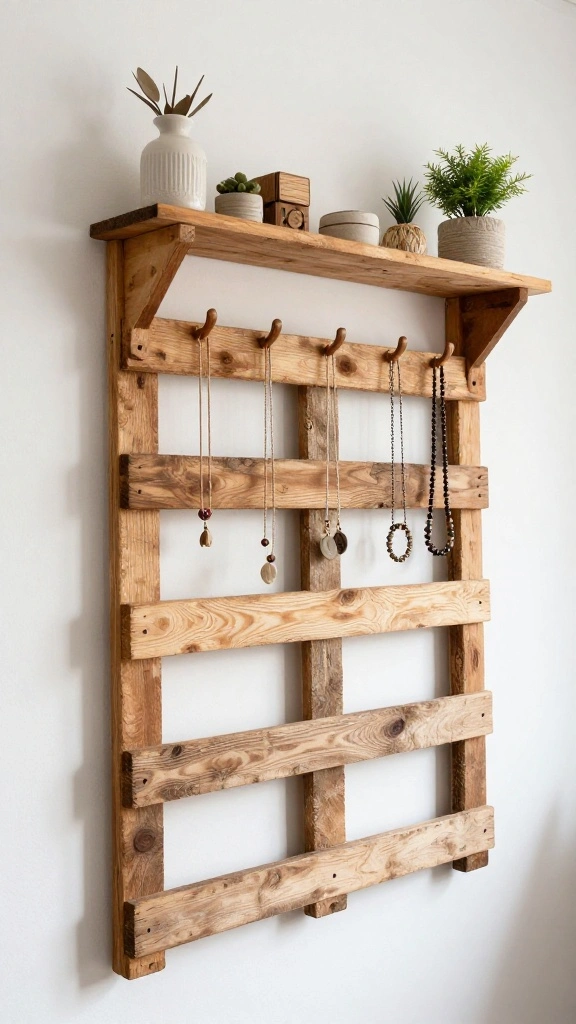
Using a wooden pallet for a jewelry organizer is a delightful way to embrace rustic charm in your home. This project highlights the beauty of natural wood while providing a practical solution for storing your accessories. Picture a rustic palette adorned with your favorite necklaces and bracelets, creating a stunning visual backdrop.
To bring this idea to life, consider using a sanded pallet that suits your decor style, whether you prefer a natural finish or a bold color. This project is not only cost-effective but also a great conversation starter!
Check out these creative ideas:
– Use various sized hooks for different jewelry types.
– Paint the pallet to match your room’s color scheme.
– Add a small shelf on top for extra storage options.
This project enhances your space while providing a beautiful home for your jewelry, combining functionality with aesthetic appeal.
4. Upcycled Tin Can Organizer
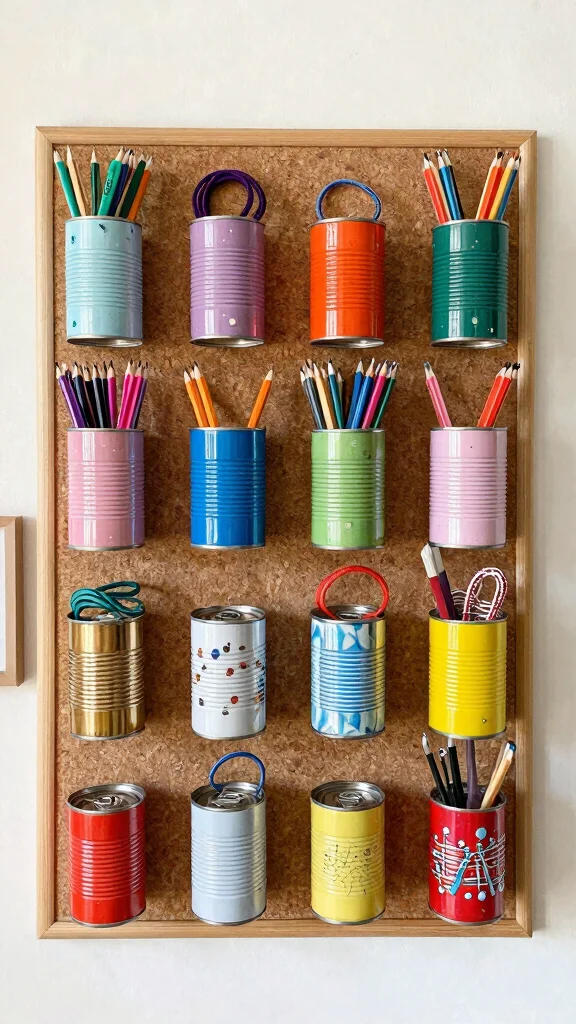
Empty tin cans can be transformed into quirky storage solutions that showcase your creativity. This fun DIY project offers a playful twist on organizing your accessories while being eco-friendly. Imagine a colorful display of patterned cans filled with your favorite jewelry, adding charm to any room.
To start, gather some empty cans and think about using vibrant colors or fun patterns to decorate them. This project is not only budget-friendly but also a fantastic way to add a personal touch to your decor.
Embrace these fun tips for your organizer:
– Use washi tape for quick and easy decoration.
– Create a color gradient with similar shades for a cohesive look.
– Hang cans at varying heights for an artistic flair.
These upcycled cans are not just practical; they also add a lively and eclectic vibe to your home, keeping your accessories organized and easily accessible.
5. Corkboard Earring Holder
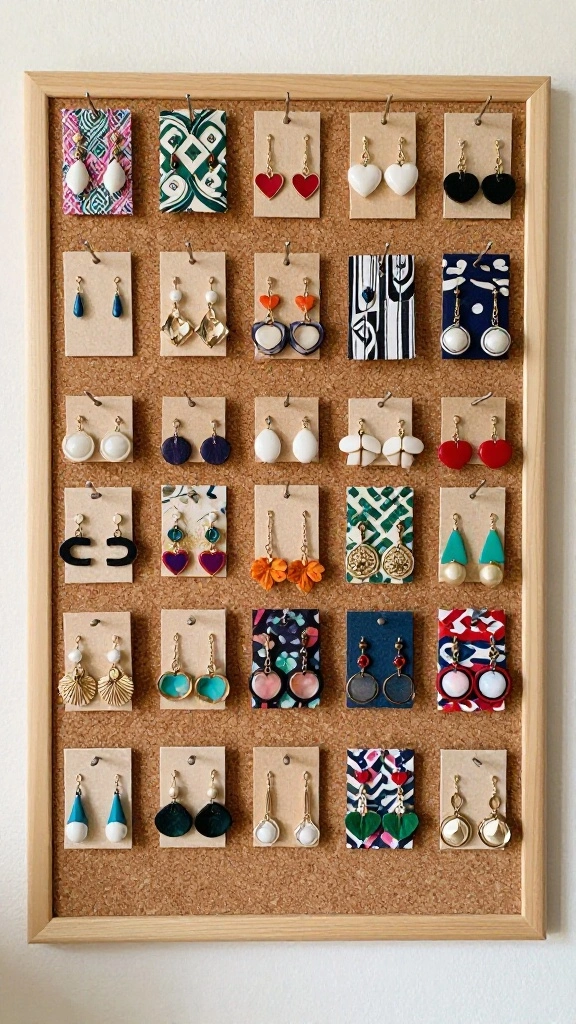
Corkboards offer a practical solution for organizing earrings without the risk of tangling. This DIY project allows you to customize your storage while adding a decorative touch to your space. Imagine an eye-catching corkboard adorned with your favorite earrings, easily accessible and beautifully displayed.
To create your own earring holder, choose a corkboard that complements your decor and cover it with fabric for a personal touch. This project is not only simple but also a perfect way to keep your jewelry vibrant and visible.
Here are some benefits of this project:
– Customize with fun fabrics and colors for a unique look.
– Keep earrings organized and easily within reach.
– Simple to create and fits seamlessly into any space.
This earring holder adds a personal flair to your decor while ensuring your accessories are neatly organized and easily accessible.
6. Fabric Scrap Bow Holder
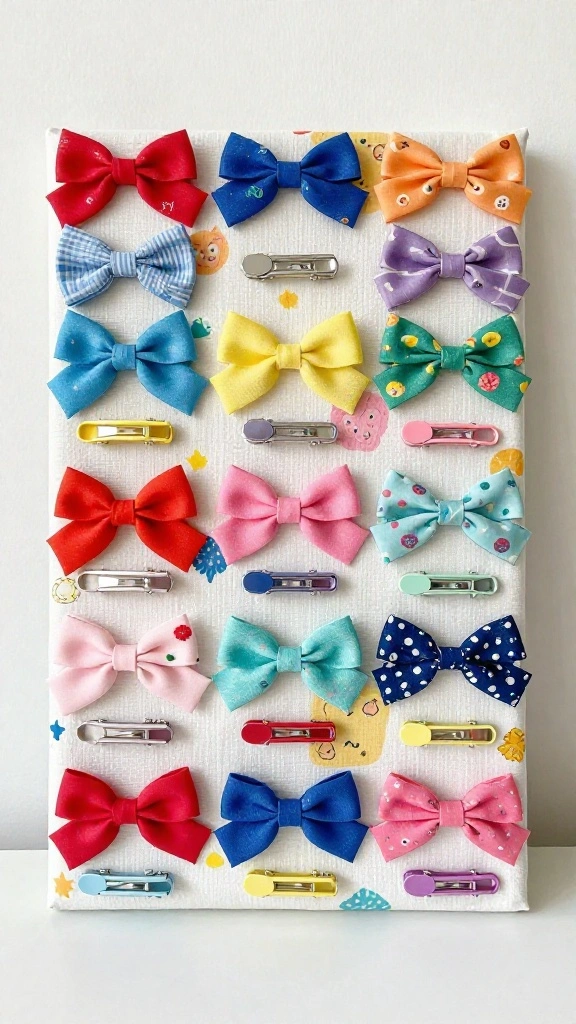
If you have leftover fabric scraps, why not craft a fun bow holder for your hair accessories? This DIY project allows you to showcase your creativity while keeping your bows and hair ties beautifully organized. Picture a colorful display of bows hanging on a stylish board, adding a cheerful touch to your room.
For this project, simply choose a fabric that inspires you and cover a wooden board for a personalized look. This is a fantastic way to repurpose materials while creating a functional piece.
Follow these steps to create your bow holder:
– Secure your chosen fabric tightly over the board.
– Attach clips or hooks for easy hanging of accessories.
– Add decorative elements like ribbons for added charm.
This delightful project organizes your hair accessories while creating a beautiful display in any space, making it both functional and attractive.
7. Repurposed Picture Frame Jewelry Display
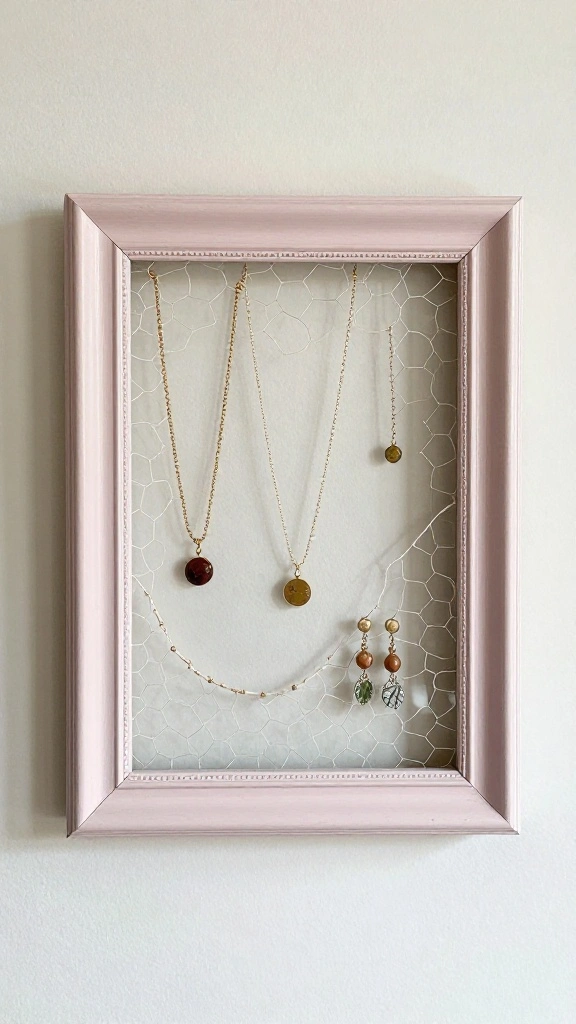
Old picture frames can be creatively repurposed into stunning jewelry organizers, blending art with functionality. This project allows you to showcase your favorite pieces while keeping them organized. Imagine your jewelry hanging elegantly on a frame, transforming clutter into a beautiful display.
To make this DIY project shine, remove the glass and backing from the frame, then attach chicken wire or string for hanging your jewelry. This is a simple yet impactful way to add character to your space.
Consider these DIY tips:
– Paint the frame to match your overall decor style.
– Use decorative clips to enhance the display.
– Hang the frame on the wall or place it on a dresser for easy access.
This unique jewelry holder not only keeps your accessories organized but also serves as a striking piece of wall art, showcasing your personal style beautifully.
8. Wooden Spoon Ring Holder
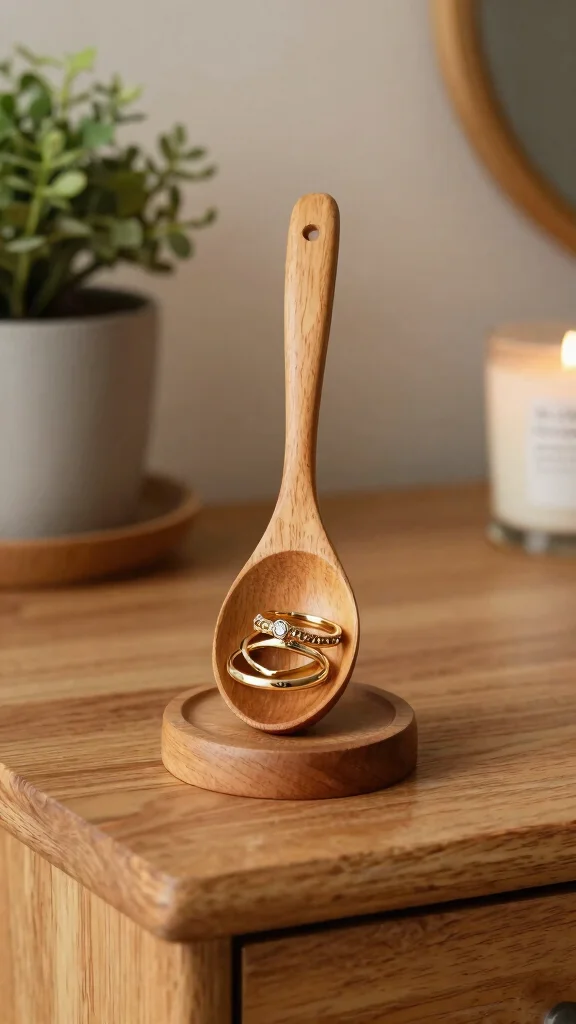
Transforming a wooden spoon into a chic ring holder is a delightful way to add a rustic touch to your decor. This creative project not only saves space but also showcases your rings beautifully. Imagine a charming spoon sitting on your dresser, holding your favorite accessories.
For this project, select a sturdy wooden spoon and attach it to a small block for stability. This simple design is effective and adds warmth to your decor.
Follow these crafting steps:
– Sand and finish the wooden spoon for a polished look.
– Secure the spoon’s handle to a base using glue.
– Display it on your dresser or bathroom counter for easy access.
This unique ring holder enhances your space while offering a practical solution for organizing your accessories, all with a touch of rustic charm.
Keeping rings and bracelets on a wooden spoon sounds quirky, but it works—it’s an easy, budget-friendly accessories holder diy hack. Grab a sturdy spoon, glue it to a small block, and voilà: a rustic organizer that saves space and sparks creativity.
9. Egg Carton Storage Solution
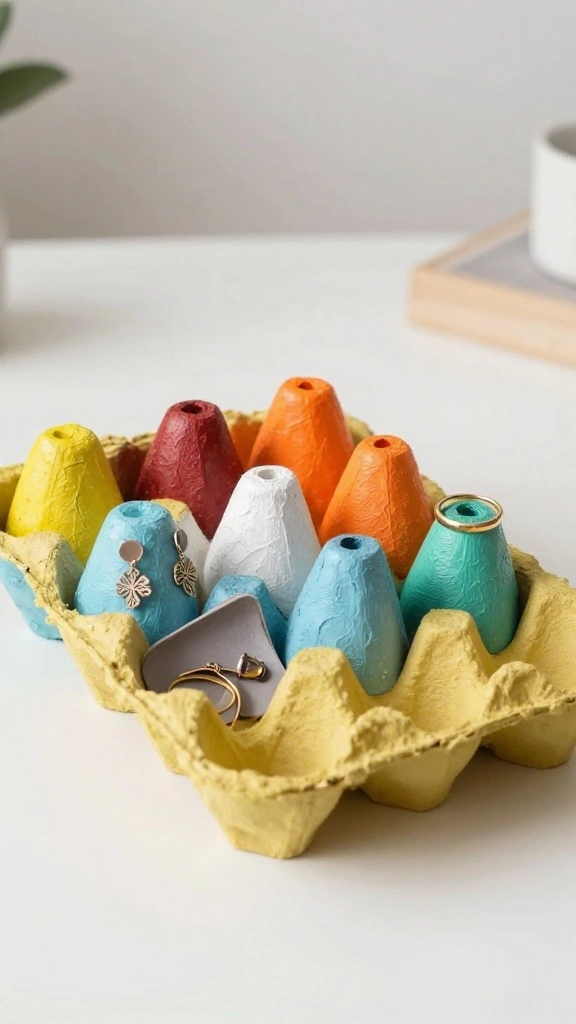
An empty egg carton can become a quirky and sustainable storage solution for your smaller accessories. This fun DIY project allows you to repurpose materials while keeping your jewelry organized. Imagine a colorful egg carton filled with rings and earrings, adding a playful touch to your decor.
To start, simply cut the carton in half, paint it in your favorite colors, and use each compartment to neatly store your accessories. This project is not only cost-effective but also eco-friendly, making it a great choice!
Here are some advantages of this idea:
– Super easy and quick to create with minimal effort.
– Ideal for small spaces or as a travel companion.
– Eco-friendly and cost-free solution!
This whimsical project breathes new life into discarded materials while keeping your accessories organized and easy to find.
Difficulty Rating & Requirements
Overall Difficulty Rating: Easy
Creating DIY accessories holders can be rated as easy. Most of these projects require minimal skills and common household items. They are suitable for beginners or anyone looking to refresh their home decor without stress.
Time Estimate: ⏱ Estimated time: 1-3 hours
– Planning and Gathering Materials: 30-60 minutes. Collect necessary items and decide on designs.
– Creating the Holder: 1-2 hours. The actual crafting time varies based on your chosen project.
– Finishing Touches: 30 minutes. Add any paint, embellishments, or last-minute adjustments.
Skill Requirements:
– Required skills: Basic crafting skills, such as cutting, gluing, and painting.
– Beginner-friendly: Yes. Most projects are straightforward, allowing beginners to gain confidence.
– Skills that can be learned include basic measuring and decorating techniques, while advanced woodworking or sewing may require prior experience.
Tools & Materials Needed: 🧰
– Scissors: Required
– Glue Gun: Required
– Paint or Stain: Optional for customization
– Screws and Wall Anchors: Required for wall-mounted projects
– Old jars or cans: Required for holders
– Corkboard or Picture Frame: Optional, depending on design
– Twine or Ribbon: Optional for decoration
– Paintbrush: Optional for applying paint or stain
Step-by-Step Overview:
1. Decide on Your Design (30-60 minutes): Choose one of the 15 ideas that fits your style and needs. Sketch it out if that helps.
2. Gather Materials (30 minutes): Collect all necessary items based on your design. Check your home for supplies before going shopping.
3. Construct the Holder (1-2 hours): Follow instructions for your chosen project. If you’re using a glue gun, ensure it’s heated properly for effective bonding.
4. Customize and Decorate (30 minutes): This is where you can add personal touches. Paint, stain, or embellish as desired.
5. Secure and Display (30 minutes): Install your holder in the desired location. If it’s wall-mounted, use screws and wall anchors for safety.
Professional vs DIY:
Creating your own accessories holders can save you money. A professional organizer might charge anywhere from $50 to $200 for similar storage solutions. In contrast, a DIY project can cost as little as $10 to $30, depending on the materials you already have. If you enjoy crafting or want to personalize your decor, tackling this as a DIY project is a rewarding option. However, if you feel overwhelmed, hiring a professional might be best for complex designs.
10. Vintage Suitcase Storage
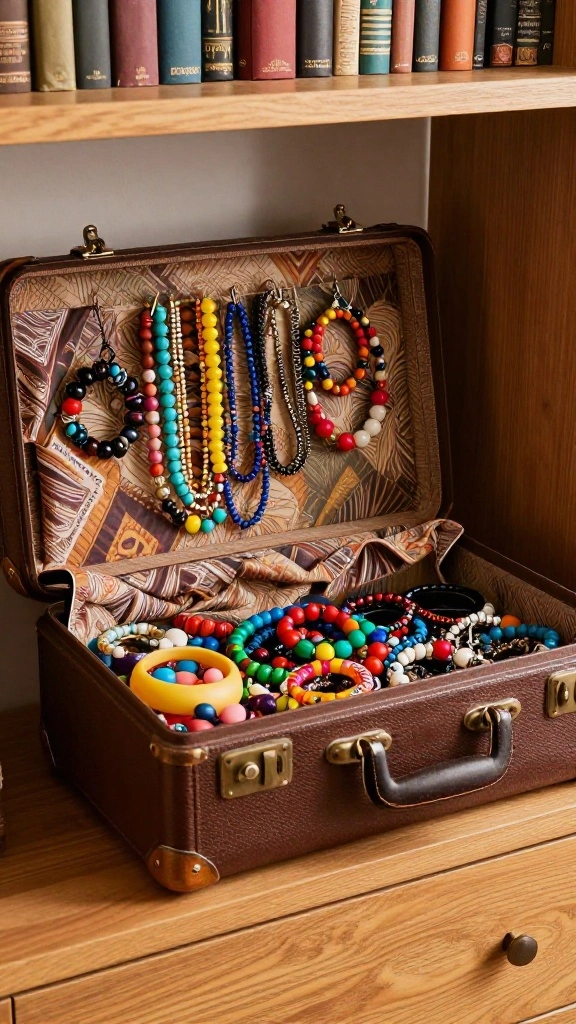
Turning a vintage suitcase into a stylish accessories holder combines charm with practicality. This creative project not only provides storage but also showcases your unique style. Picture a beautifully lined suitcase filled with bracelets and necklaces, adding character to your space.
To create this organizer, clean the inside of the suitcase and consider lining it with vibrant fabric for a pop of color. This project beautifully blends aesthetics with functionality, making it a perfect addition to your decor.
Explore these design ideas:
– Line the interior with your favorite fabric for added flair.
– Use decorative dividers to keep items organized.
– Display it creatively on a shelf or dresser.
This vintage suitcase not only adds character to your space but also serves as a charming conversation piece, embodying the spirit of upcycling.
Fun fact: in small kitchens, a vintage suitcase can add up to 30% more storage space for tumblers. These tumbler storage ideas blend nostalgia with practicality, keeping cups organized behind a colorful lid and turning shelving into a charming decor piece.
11. Twine-Wrapped Glass Jar Holder
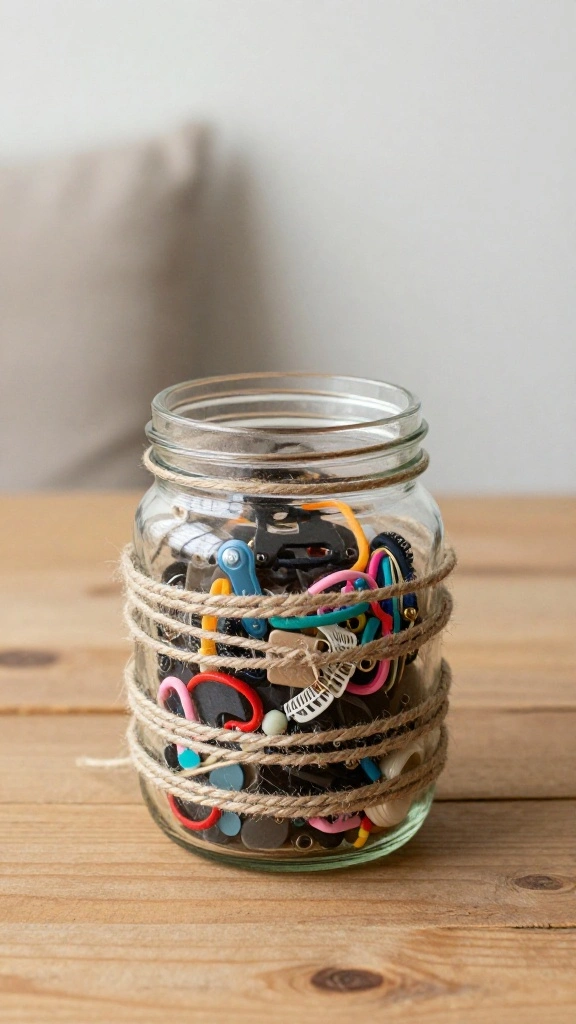
Transforming glass jars into charming accessories holders with twine is a delightful way to add a rustic feel to your space. This simple DIY project offers a cozy, handmade touch while organizing your items. Imagine a collection of twine-wrapped jars holding pens or rings, bringing warmth to your decor.
Start by cleaning the jars and removing any labels, then wrap them with twine for a lovely finish. This project is budget-friendly and allows you to showcase your creativity.
Here’s how to create your holders:
– Clean and dry the jars thoroughly before starting.
– Secure one end of the twine and wrap it around the jar.
– Use glue to secure the end once finished.
This easy and resourceful DIY not only reduces waste but also adds a charming touch to your home, making it both functional and aesthetically pleasing.
12. Decorative Book Box Organizer
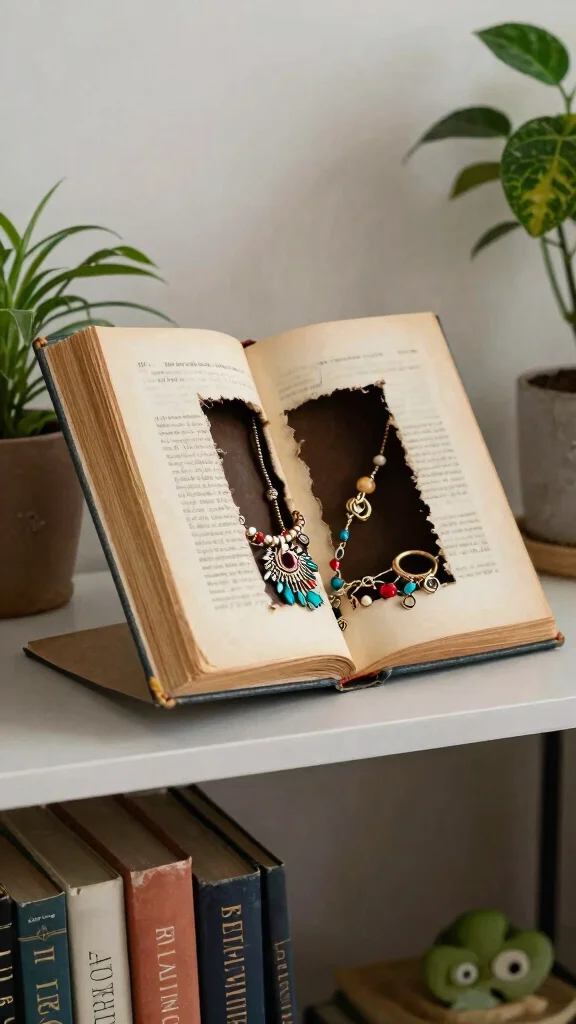
Transforming an old book into a decorative box organizer is a clever way to hide clutter while adding a unique element to your decor. This project allows you to create a functional piece that seamlessly fits into your space. Imagine a beautifully hollowed-out book sitting on your shelf, holding your favorite rings or earrings.
To start, choose a hardcover book and carefully cut out the pages to create a hollow space. This can be a fun project that adds a personal touch to your organization.
Follow these steps for your book organizer:
– Select an old hardcover book you no longer need.
– Cut out the pages to create a hollow interior.
– Decorate the cover to match your decor theme.
This clever organizer doubles as a unique piece of art, keeping your treasures safe while enhancing your home’s charm.
13. Woven Basket Organizer
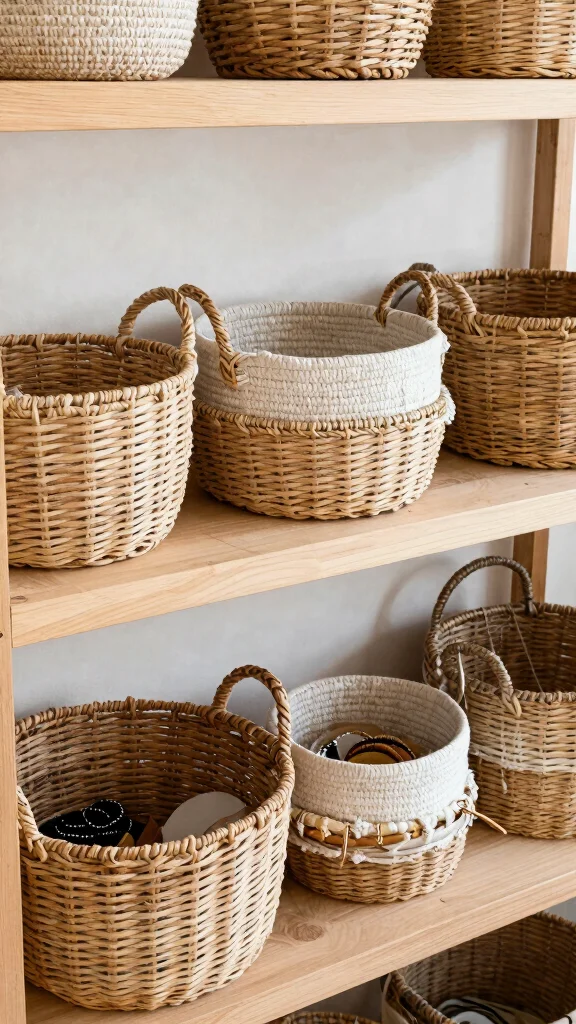
Woven baskets are a stylish and eco-friendly solution for organizing your accessories. This project allows you to embrace natural materials while enhancing your decor. Picture a collection of baskets in various sizes filled with jewelry, adding warmth and texture to the room.
To implement this idea, choose baskets that suit your style, and consider labeling them for easy identification. This project is versatile and can adapt to any decor theme.
Here are some benefits of using woven baskets:
– Versatile and stylish for any decor style.
– Easy access to your accessories keeps things organized.
– Eco-friendly option that promotes sustainability.
These baskets not only keep your space tidy but also add a natural touch, making it easier to grab your accessories and enhancing the overall aesthetic.
14. Glass Bottle Jewelry Holder
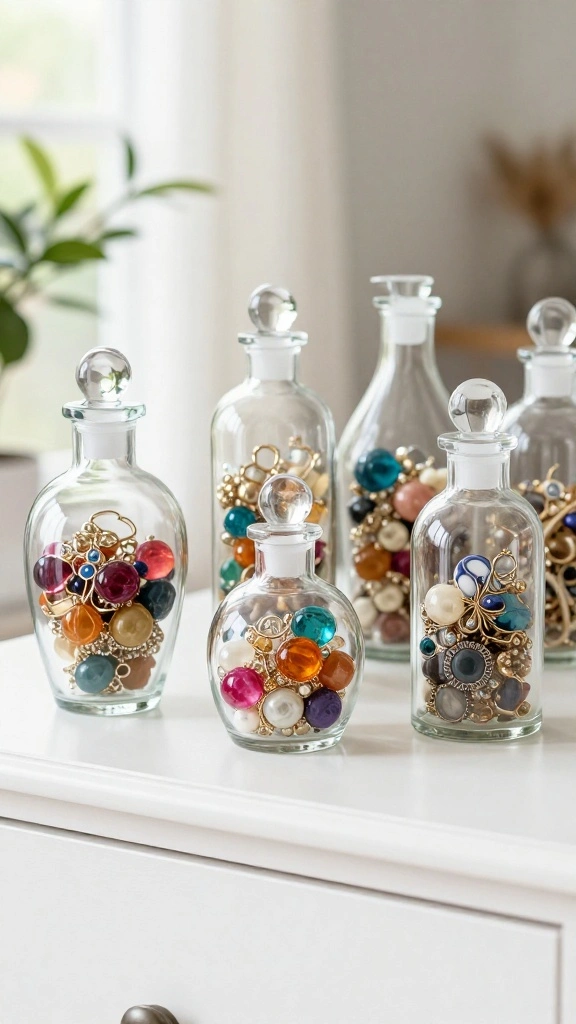
Upcycling glass bottles into chic jewelry holders is a creative way to showcase your personal style. This project allows you to use materials that might otherwise go to waste. Imagine beautifully arranged bottles filled with necklaces and bracelets, adding a unique decor element to your space.
Start by cleaning and drying the bottles, then consider painting or decorating them with twine for a personalized touch. This budget-friendly project offers both functionality and beauty.
Follow these steps to create your holders:
– Clean and dry the glass bottles thoroughly before decorating.
– Add paint or twine for a customized look.
– Arrange them on your dresser or shelf for display.
This creative use of glass bottles not only keeps your accessories organized but also elevates your decor, showcasing your individual style in an eco-friendly way.
15. Clothespin Photo Holder with Accessories
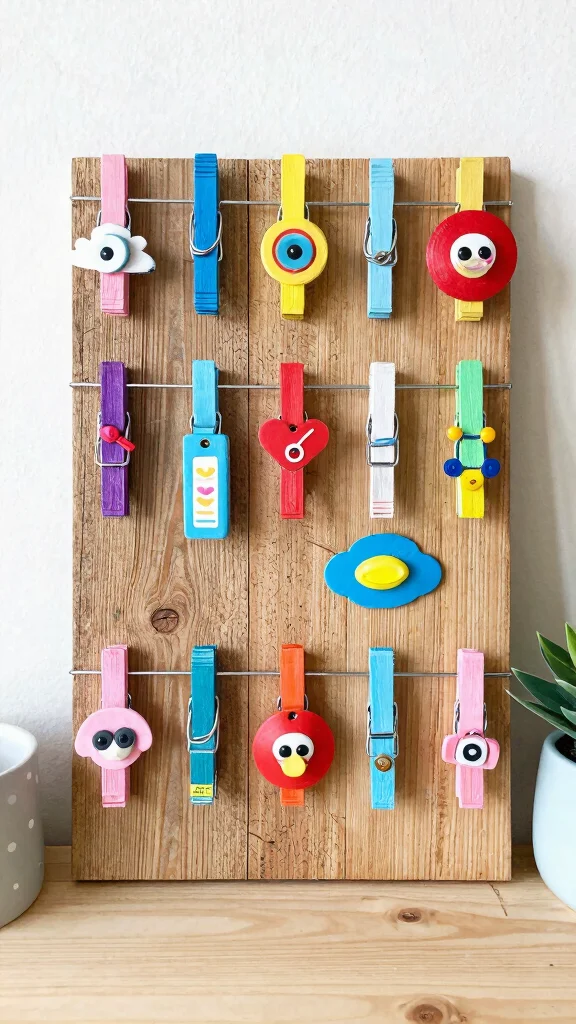
Transforming simple clothespins into a charming accessory holder is an enjoyable way to add color and creativity to your space. This project allows you to organize your jewelry while showcasing your artistic side. Picture bright, painted clothespins holding earrings and photos, creating a delightful display.
To start, gather clothespins and paint them in fun colors that match your decor. This project is simple yet effective, making it a great addition to any room.
Check out these creative tips:
– Use a variety of colors for a lively display.
– Combine clothespins with twine for a unique wall hanging.
– Consider this as a thoughtful gift idea!
This delightful project not only organizes your accessories but also allows for a playful expression of creativity, making it an ideal addition to your eco-friendly home decor.
Fun fact: Clothespin Photo Holder with Accessories can turn a few cheap pins into a stylish accessories holder diy, keeping earrings and photos organized in minutes. It’s budget-friendly, easy, and surprisingly sturdy—perfect for color-loving decor.
Conclusion
Creating your own accessories holders is a fantastic way to personalize your space while being eco-friendly and budget-conscious. These DIY projects not only keep your accessories organized but also serve as unique decor pieces that showcase your creativity. Explore these ideas and let your imagination fly as you craft your own storage solutions!
Which of these ideas will you try first? Share your creations with your friends and spread the joy of upcycled decor!
Note: We aim to provide accurate product links, but some may occasionally expire or become unavailable. If this happens, please search directly on Amazon for the product or a suitable alternative.
This post contains Amazon affiliate links, meaning we may earn a small commission if you purchase through our links, at no extra cost to you.
Frequently Asked Questions
What are some simple, eco-friendly materials I can use for an accessories holder diy?
Start with common upcycled items you already have: empty glass jars, tin cans, cereal boxes, wood scraps, and fabric scraps. Clean and dry everything before use.
Plan your layout, cut pieces to size, and glue or screw them together with a non-toxic adhesive. Finish with paint, stain, or a natural wax to protect the surface and add a cohesive look.
This approach embraces upcycled decor ideas and makes handmade organizers that feel polished and personal.
How can I turn everyday household items into a budget-friendly accessories holder diy?
Yes—here are quick, practical ideas you can try today.
1) Create a wall shelf from a scrap wood plank and mount a row of jars or small baskets for small items. 2) Turn mason jars into a hanging display by securing them to a wood board with clamps. 3) Reinforce a cereal box into a slim magazine style organizer with glue and tape. 4) Make a jewelry board by pinning a cork or felt board to a frame and adding hooks.
All of these are DIY home decor projects that keep costs down and use budget-friendly accessories techniques.
What are the best ways to customize an eco-friendly accessories holder diy to fit small spaces?
Think vertical and modular.
Mount a pegboard or corkboard on the wall and add hooks or small bins to keep items visible without taking up floor space. Use a narrow wall shelf or a recessed ledge to hold frequently used accessories. Create a magnetic strip on a painted wood board for bracelets or metal pieces. All of these creative storage solutions stay within a budget and align with eco-friendly goals.
How do I make sure my handmade organizers are sturdy and long-lasting?
Choose durable base materials such as thin wood boards, metal, or thick recycled cardboard reinforced with kraft. Use strong glue and nails or screws where possible. Sand edges smooth and seal with a clear finish to protect from wear and moisture. Add braces or corner supports for larger pieces. This approach ensures your handmade organizers stay useful for years and still look great as DIY home decor.
Can these upcycled decor ideas hold different types of accessories like jewelry, sunglasses, and hair ties?
Yes. Design compartments or hooks to suit items of varying sizes: small dividers for rings and bracelets, wider slots for sunglasses, and a few hooks for hair ties. Label or color code sections to stay organized. With creative storage solutions and handmade organizers, you can mix and match components to fit your collection while keeping things budget-friendly.
Related Topics
home decor
budget-friendly accessories
DIY accessories holder
eco-friendly decor
upcycled storage
creative organizers
minimalist design
easy DIY projects
beginner friendly
handmade storage solutions
sustainable living
quick crafts